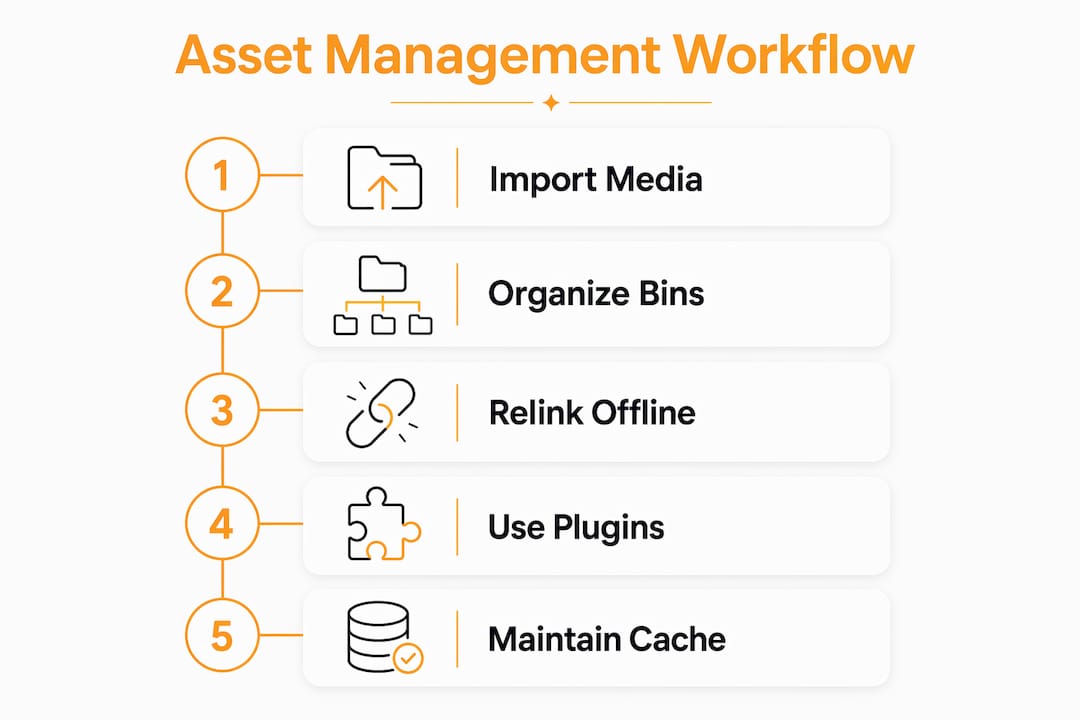
Managing media assets in Premiere Pro means using bins, relinking workflows, and automation plugins to keep every clip, graphic, and audio file organized and instantly accessible throughout your edit. Premiere Pro’s native Project panel gives you the foundation, while tools like Team Projects media management and the premiere-pro-folder-watcher plugin extend that foundation into collaborative and high-volume environments. Get this right and you cut the time you spend hunting for offline clips, avoid broken project files, and finish edits faster. Get it wrong and a single renamed folder can send your entire timeline gray with offline media.
How to manage media assets in Premiere Pro using bins
Premiere Pro bins act as folders inside the Project panel, holding and organizing every imported media asset without moving the actual files on disk. Think of a bin as a label on a physical film can. The can sits in the vault, but the label tells you exactly what’s inside and where it belongs.
Creating a bin is as simple as clicking the folder icon at the bottom of the Project panel or pressing Ctrl+B (Cmd+B on Mac). From there, you can rename it, nest bins inside other bins, and delete empty ones without touching your source files. The structure you build here directly shapes how fast you can find a clip at 2 a.m. on a deadline.
Here are the bin categories that work for most projects:
- Footage — raw camera files, organized by shoot day or camera angle
- Audio — dialogue, music, SFX, and room tone in separate sub-bins
- Graphics — motion graphics templates, titles, and lower thirds
- Exports — reference cuts, client deliverables, and rough cuts
- Stock — licensed clips from Adobe Stock or other sources
Mirroring your filesystem structure inside Premiere bins is the single most effective habit you can build. When your bins match your folders on disk, relinking offline media becomes a one-click operation instead of a 30-minute search. This also reduces the cognitive load of switching between Finder or File Explorer and Premiere mid-edit.
Pro Tip: Name your bins with leading numbers (01_Footage, 02_Audio, 03_Graphics) so they sort in a logical order every time you open the Project panel. Premiere sorts alphabetically by default, and numbered prefixes keep your most-used bins at the top.

How to relink offline media in Premiere Pro Team Projects
Offline media is one of the most disorienting things you can encounter mid-project. Clips turn gray, the timeline goes silent, and suddenly your edit looks like a ransom note. The good news is that Premiere Pro’s Team Projects media management dialog gives you a structured path back.
The Media Management dialog is accessible via Edit > Team Project > Media Management. It lets you create new media mappings and relink missing assets to their correct locations on your local drive. Here is the step-by-step workflow:
- Open the Media Management dialog via Edit > Team Project > Media Management.
- Identify the offline clips listed under missing media mappings.
- Click “Add New Mapping” and point Premiere to the correct folder on your local drive.
- Confirm the mapping and let Premiere scan for matching file names and formats.
- Verify the relinked clips play back correctly in the Source Monitor before closing the dialog.
The critical detail here is that relinking media in Team Projects is a local-only change. Your new mapping does not overwrite the shared project paths that your collaborators rely on. This means you can fix your offline media without accidentally breaking anyone else’s timeline. That distinction matters enormously on agency projects where three editors might be working from different drives or locations.
Common causes of offline media include renamed folders, moved hard drives, disconnected network storage, and mismatched drive letters on Windows. The fastest diagnostic is right-clicking an offline clip and choosing “Link Media.” Premiere will show you the last known path, which tells you exactly where the file used to live.
Pro Tip: Always relink media locally using the Team Projects “Link Media” feature rather than the standard offline relink dialog. Local relinking preserves shared media mappings and keeps your collaborators’ projects intact.
What third-party tools can automate Premiere Pro asset management?
Manual importing works fine for a 3-minute YouTube video. It breaks down fast on a documentary with 400 clips across 12 shoot days, or a social media agency pushing out 30 pieces of content a week. That is where automation tools shift from nice-to-have to non-negotiable.
The premiere-pro-folder-watcher plugin automatically mirrors your folder structure into Premiere bins and imports new media files in real time. Drop a clip into a watched folder and it appears in the corresponding bin within seconds. The plugin uses debounce intervals to handle rapid file events without hammering Premiere’s performance, so real-time imports stay smooth even when you’re copying large batches of files.
For enterprise teams, the Kaltura Premiere panel integrates a full digital asset management library directly inside Premiere Pro. You can browse, search by metadata, import proxy files, and publish finished content without leaving the editing environment. It also supports governance controls, meaning admins can restrict which assets editors can access. That level of structure is what post-production agencies and broadcast teams need when managing thousands of assets across multiple projects.
Here is how manual and automated approaches compare:
The breakdown above makes the choice clear. If you’re a freelancer cutting branded content, the folder watcher plugin gives you 80% of the benefit with almost no setup cost. If you’re running a post-production house with a shared media server, a DAM integration like Kaltura is the right call. For enterprise workflows, treating Premiere as the editing environment while relying on an external DAM as the source of truth for metadata is the architecture that scales.
Pro Tip: Use the folder watcher plugin’s filtering options to exclude system files and unsupported formats from auto-import. This keeps your bins clean and prevents Premiere from choking on thumbnail files or hidden OS metadata.
How to maintain an efficient workflow for media assets throughout your edit
Good organization at the start of a project means nothing if your habits fall apart by week two. Maintaining an efficient workflow for media assets requires discipline at every stage, from the first import to the final export.
Here are the practices that hold up under pressure:
- Prevent duplicate imports by always importing from a single source folder rather than dragging clips directly from the desktop or downloads folder. Duplicates bloat your Project panel and create confusion about which version of a clip is the correct one.
- Consolidate duplicates using Project > Consolidate Duplicates before you share a project with a collaborator. Premiere identifies clips pointing to the same source file and merges them into a single Project panel entry.
- Manage your media cache regularly. Deleting cache files in Premiere Pro is safe and forces cache regeneration without touching your original media. This resolves playback stutters and performance slowdowns that accumulate over long projects.
- Use Adobe Stock integration to add licensed assets without breaking your timeline. The Adobe Stock panel lets you insert watermarked previews directly into your sequence and replace them with full-resolution licensed files later, preserving all your edits and timing.
- Label and color-code clips in the Project panel using Premiere’s label system. Assign one color to A-camera footage, another to B-roll, and a third to graphics. This visual layer makes scanning a crowded Project panel dramatically faster.
The cache point deserves extra attention. Many editors treat the media cache as untouchable, fearing they’ll lose work. You won’t. The cache is purely a performance layer. Clearing it periodically, especially after ingesting large amounts of new footage, keeps Premiere running at full speed without any risk to your project.
For collaboration, prepare your media before sharing by consolidating your project and confirming all paths are on a shared network drive or cloud storage location that every team member can access. Document your folder structure in a shared README file so new editors joining mid-project understand the organization immediately.
Key takeaways
Efficient Premiere Pro asset management requires consistent bin structure, disciplined relinking habits, and the right automation tools matched to your project scale.
Structure bins to match your filesystem so relinking offline media takes seconds, not hours.
Use the Media Management dialog to fix missing media without touching collaborators' shared paths.
A folder-watcher workflow mirrors folders into bins in real time, cutting out manual importing.
Deleting media cache files resolves performance issues safely, with no risk to your original media.
Native bins for solo work, folder watchers for mid-size teams, DAM integrations for enterprise.
The edit skill nobody talks about enough
Talking to editors all day, I see the same pattern: the hours disappear not into hard cuts, but into hunting for a clip. That is a workflow problem, not a creative one, and it is almost entirely preventable.
The habit worth building is setting up your bin structure before you import a single file. Open the project, create your bins, then import. It takes about four minutes and saves forty. Most editors do it backwards, importing everything and organizing later, and later never comes; by the time the timeline is half-built, reorganizing the Project panel feels like surgery on a moving patient.
The second is relinking discipline in Team Projects. Use the local-only Media Management workflow rather than the standard offline dialog, because one editor relinking the wrong way can knock an entire team offline. Our beginners guide to Premiere Pro covers the collaborative basics; the relinking nuance is the kind of thing you usually learn by breaking it once.
And for anyone importing constantly, automating the import step removes a whole category of mental overhead: files just show up in the right bin instead of waiting on you to remember. Pair that with a solid bin structure and a regular cache-clear, and you have a media-management system that holds up under real production pressure.
Take your Premiere Pro workflow further with Filmit
If you’re spending more time managing assets than actually editing, Filmit has tools built specifically to fix that. Filmit’s plugin suite for Adobe Premiere Pro automates the repetitive parts of your workflow, from organizing projects to sourcing and inserting media, so you stay in your creative flow instead of fighting your file structure.

The Filmit for Editors toolkit covers everything from GIF insertion and stock footage sourcing to LUT management and project organization. If you want to go deeper on sourcing and organizing assets inside Premiere, Sourcer is built exactly for that use case. And Organizer — already automating project cleanup in After Effects — is coming to Premiere Pro to sort your footage, audio, and graphics into a clean bin structure in one click. Every tool installs through Filmit Studio, the free companion app for Windows and macOS, so setup takes minutes.