If you cut interviews and documentaries in DaVinci Resolve, you already know where the day goes. It is not the color or the sound design, it is the rough cut. You sit down with 45 minutes, or three hours, of talking heads and scrub every minute looking for the handful of lines that carry the story. That is assistant editor work, it is slow, and it stands between you and the parts of editing that are fun.
RoughCut does that pass for you, right inside Resolve. It is an AI assistant editor that installs as a Workflow Integration, transcribes your timelines, reads every quote, and assembles a hero cut, a cut-down, and a batch of shorts straight into a RoughCut folder in your project. It also runs in Premiere Pro, with Final Cut planned, but this walkthrough is Resolve start to finish, because a few things genuinely work differently here. Here is the whole flow.
This video may reference an older version of RoughCut. Features and UI may have changed since recording.
Install RoughCut for DaVinci Resolve
RoughCut installs through Filmit Studio, the desktop app you download when you start a free trial (Mac and PC). Open My Tools, click over to DaVinci Resolve, and you will see the full library that works in Resolve: RoughCut, the other editing plugins, and the whole GPU effects and Filmit transitions suite. Find RoughCut and click the yellow install button.
One thing worth knowing before you spend anything: the 7-day trial unlocks the entire bundle, not just RoughCut. The effects and transitions that also run in Resolve are yours to try in the same trial, so you are testing the whole suite, not one plugin in isolation.
Open it the Resolve way: Workspace, Workflow Integration
This part is specific to Resolve. You do not open RoughCut from an Extensions menu the way you would in Premiere. Instead, go to Workspace, then Workflow Integration, and you will see every Filmit tool you have installed. Click Rough Cut and the panel opens docked in your workspace. That is the standard way to open any Workflow Integration panel in Resolve, so the path to remember is Workspace, then Workflow Integration, then Rough Cut.
Add your timelines and transcribe with Whisper
Here is the first real Resolve difference: in Premiere your sources are sequences, but in Resolve they are timelines. So make sure the footage you want RoughCut to analyze is already laid into timelines in your project. For the demo I had a distillery mini documentary in timelines: an owner interview, a distiller interview, and two facility tours, roughly 45 minutes of footage. The audio was already synced to the cameras, and multicam is completely fine, RoughCut works from the timeline either way.
In RoughCut, click Add from your project and bring those timelines in as sources, then click Transcribe all. The first time, you may see an Install Whisper button at the top. Whisper is an open source transcription engine that runs locally on your own machine, so it is free, private (nothing is uploaded to the cloud), and genuinely accurate. Install it once and let it work through every timeline, turning your footage into the text the AI reads.
Pro Tip: If you see DaVinci Resolve churning in the background during Transcribe all, that is expected, not a glitch. RoughCut is rendering each timeline out to text with Whisper on your own machine, so let it finish rather than clicking around in Resolve while it works.
Tell it the story and set your deliverables
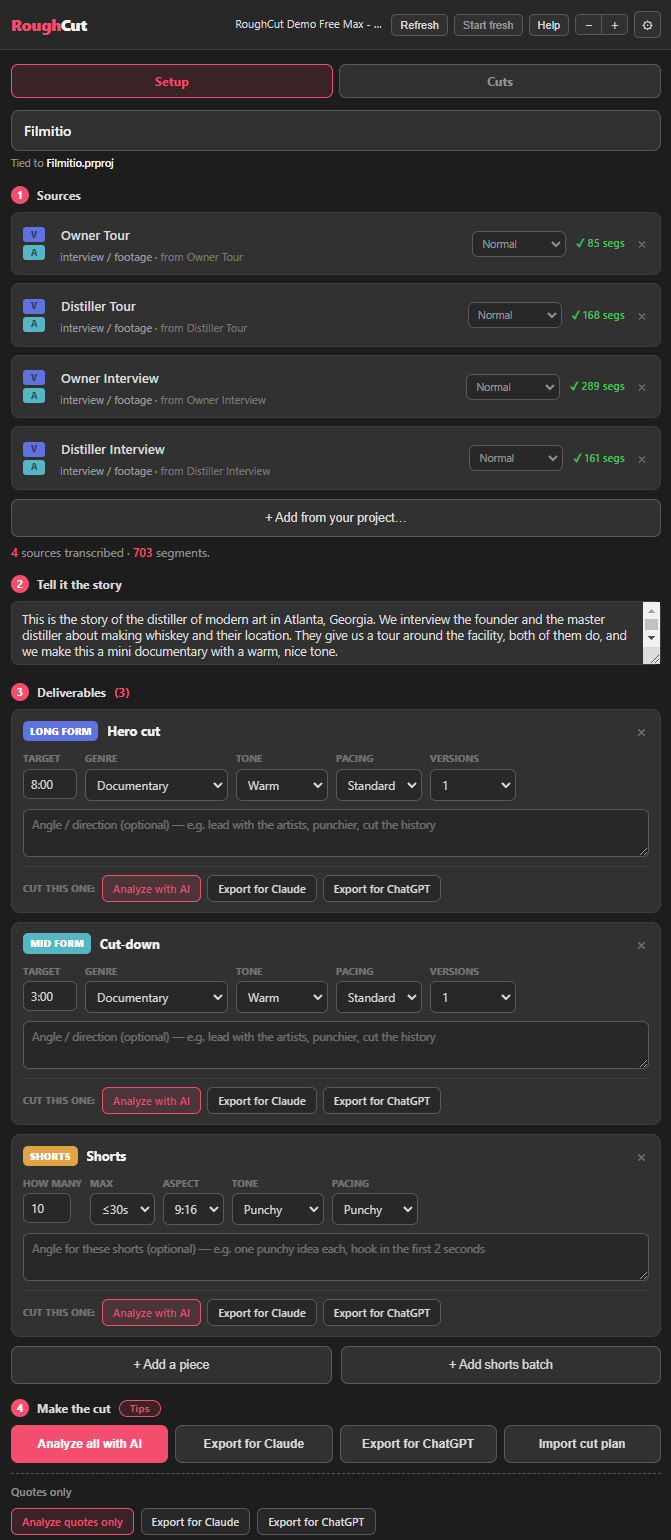
Now you talk to RoughCut like a person. In the story box, describe the piece in plain language, for example: this is a mini documentary about the Distillery of Modern Art, we interview the founder and the master distiller and they give us a quick tour. That one sentence points the analysis in the right direction.
Then set your deliverables, and this is where the tool is smarter than it looks. RoughCut has an engine that understands what kind of content you are making. For the demo I asked for three pieces: a long form 8-minute documentary as the hero cut (warm tone, standard pacing), a 3-minute cut-down as a punchy brand film, and 10 shorts under 30 seconds at 9:16. Because I told it these were documentary pieces, it analyzes them that way. If you were cutting gaming highlights instead, you would set that content type and it would tailor the analysis. You can add optional angle directions per cut, but they are not required.
Analyze the footage, then shape the cut
You have two ways to run the analysis. The quick way is Analyze with AI: add an OpenAI or Anthropic key in settings (or save it once in your Filmit Studio dashboard), pick your model, and click. In the demo it read 645 quotes and designed all three deliverables in a few minutes. That analysis is the only step that can ever cost anything, and only if you use your own key, at about $0.20 per analysis. The free way skips even that: click Export for Claude or Export for ChatGPT, drop the file into a free chat, and import the cut plan it hands back. Free Claude handles the large context better than free ChatGPT, and you can export your deliverables one at a time to stay inside a free chat's limits. Either way, building the cut onto your Resolve timelines never costs a thing.
When the analysis lands, you are on the Cuts panel, and this is where you take over. RoughCut does not edit the video for you, it builds a structured first pass so you can shape it fast. Reorder quotes by dragging them, rename a section if the AI's label does not fit, and move a whole section up or down. Want a different line? Open All Quotes and add it. Like a quote but not for this cut? Uncheck it and it stays out of the build without being deleted. If the hero cut runs long, or the cut-down comes back at 3:55 against a 3:00 target, that is fine for a rough cut. Just uncheck or remove a few quotes until it hits your length.
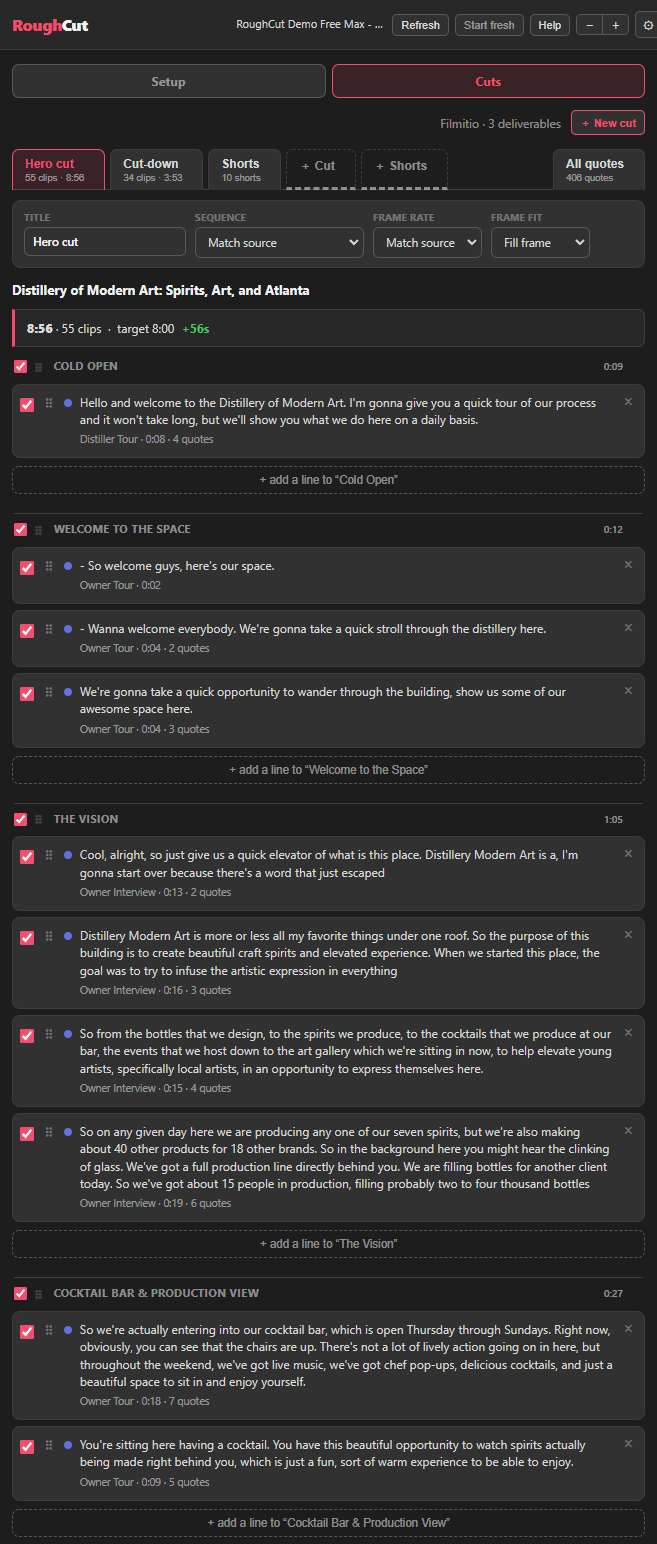
The All Quotes tab is its own workflow. Every line RoughCut pulled is there, auto-tagged into hooks, themes, and more. Search and tag sorting are live in the DaVinci build now, so you can type a word, jump straight to the matching quotes, and drop the right one in.
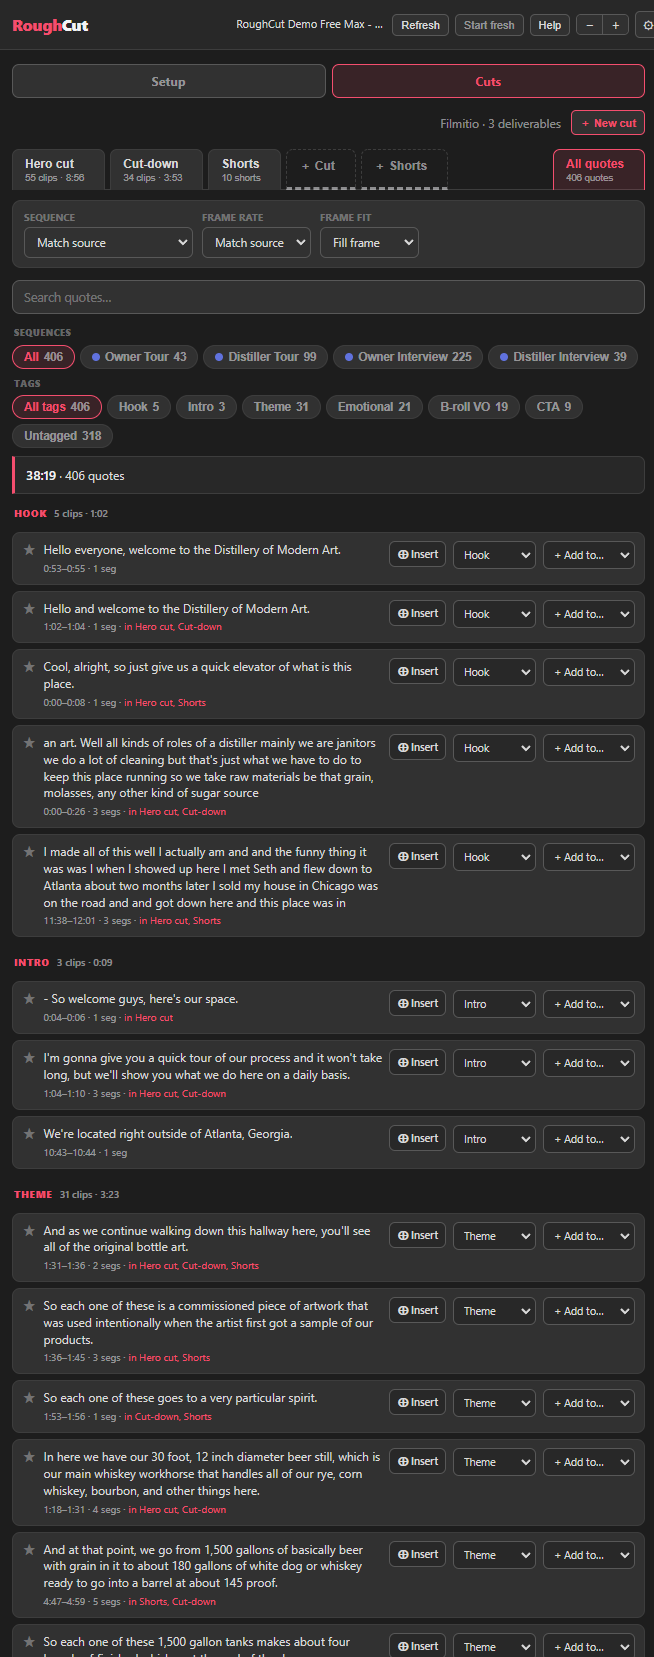
Pro Tip: Unchecking a quote beats deleting it. It drops the line out of the built timeline but keeps it in the cut, so if you change your mind you just check it again. Use it to trim toward your target length without ever losing options.
Build all in Resolve (and why it looks quiet)
When the cut reads the way you want, go to the bottom of the panel. Build in Resolve builds the tab you are looking at; Build all in Resolve builds everything at once, the hero cut, the cut-down, and all ten shorts, into a tidy RoughCut folder. The shorts are built vertical automatically. For specific output sizes (4K, 2.39:1, whatever the deliverable needs) set the preset in RoughCut's settings, or just change it in Resolve after the build.
Here is the honest Resolve caveat. In Premiere you get to watch the timelines assemble live, clip by clip, and it looks very cool. Resolve does not do that. It can look like nothing is happening until it is suddenly done, but RoughCut is working the whole time, Resolve just does not animate it on screen. So when you click Build all in Resolve, let it run, walk away, and come back. You will see the hero cut finish, then the cut-down, then the shorts fill in, and your RoughCut folder is full of finished timelines ready to edit.
While you are editing, you can also insert quotes straight from the panel. Deep in the whiskey section of a whiskey film and want another line about it? Open All Quotes, search whiskey, and click Insert, and it drops into your Resolve timeline like a normal insert edit, no scrubbing back through raw footage.
Hand your client the whole breakdown
One more thing I use on every client job. At the bottom of any cut, Export Excel or Export CSV gives you a spreadsheet of the whole project: the hero cut, the cut-down, all the shorts, and every quote, laid out by section. I hand that to a client, they read exactly what each piece says and mark up their favorite quotes, and because it ties back to the project, turning their notes into a revised cut is quick.
RoughCut also moves fast: the team ships updates constantly and builds what customers ask for, and there is a help tab in the panel if you get stuck. To see it run live or ask a question, come find us on Discord.
Key takeaways
RoughCut runs natively in DaVinci Resolve, turning hours of timeline scrubbing into a first pass you can actually edit.
Open it from Workspace, Workflow Integration, and add your Resolve timelines as sources. Synced audio and multicam are both welcome, no Premiere required.
Whisper runs on your own machine, so transcription is free, private, and never uploaded to the cloud. Resolve visibly renders your timelines to text as it works.
Reorder quotes, rename sections, uncheck lines to exclude them without deleting, search All Quotes, and trim to your target length.
Resolve does not animate the build like Premiere, it just runs, so come back to a RoughCut folder holding the hero cut, the cut-down, and all your shorts, built vertical automatically.
Analysis is about $0.20 with your own key or free via a Claude or ChatGPT export, building is always free, and RoughCut is included in the Filmit Studio subscription.
Get started with Filmit
RoughCut installs through Filmit Studio, the desktop app you download from your dashboard to manage every Filmit plugin for DaVinci Resolve, Premiere Pro, and After Effects. It comes with a 7-day free trial that unlocks the whole bundle, so one install puts RoughCut in Resolve alongside the GPU effects and Filmit transitions that also run there. RoughCut is included in the Filmit Studio subscription, one price for the whole growing suite rather than a steep fee per plugin, and that subscription is what funds the continuous updates and the new tools we keep shipping.
RoughCut is community driven: people request a tool or a feature and the team builds it, so come tell us what you need on Discord, where I run live demos of the tools regularly. Start a free trial, install RoughCut in Resolve, and let your assistant editor build the first pass so you can get straight to the craft.