
Keyframes in animation are defined as the precise time markers where a property holds a specific value, forming the backbone of every motion design and video editing workflow. The role of keyframes animation plays in tools like Adobe After Effects and CSS is to set anchor points at the start, end, and intermediate stages of any animated sequence. Software then calculates the frames in between automatically, a process called interpolation. Master this concept and you control everything: position, scale, opacity, color, and timing. Miss it, and your animations feel stiff, unpredictable, and hard to fix.
How does keyframe animation work?
Understanding keyframe principles starts with one simple rule: at least two keyframes per property are required to produce visible animation. The first keyframe sets the starting value. The second sets the ending value. Everything in between is calculated by the software.
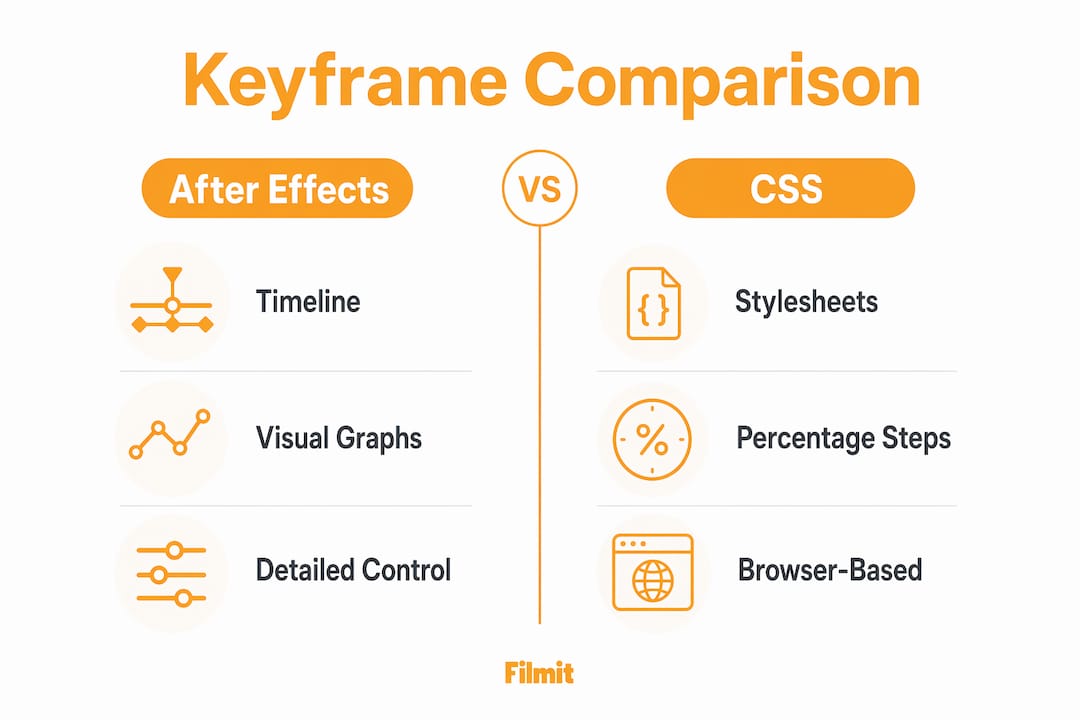
Each keyframe stores a property value at a specific moment in time. In Adobe After Effects, that moment is measured in frames or seconds on the timeline. In CSS, it is expressed as a percentage of the total animation duration. Both approaches achieve the same goal: telling the software where a property should be when.
Here is what keyframes can control in a typical motion design project:
- Position (X and Y coordinates, or 3D Z depth)
- Scale (uniform or non-uniform resizing)
- Opacity (fade in and fade out)
- Rotation (spin, tilt, or tumble)
- Color (hue shifts, tint changes)
- Custom effects (blur amount, distortion intensity)
Interpolation is the engine that makes this work. Linear interpolation moves a property at a constant speed between two keyframes. Eased interpolation slows the motion as it approaches or leaves a keyframe, mimicking how objects move in the physical world. The difference between the two is the difference between a robot walking and a human walking.
The CSS @keyframes rule defines intermediate waypoints using percentages, giving web designers the same multi-step control that video editors get in After Effects. A CSS animation can have states at 0%, 25%, 60%, and 100%, each with different property values. This is far more expressive than a simple CSS transition, which only interpolates between two triggered states.

Pro Tip: Set your first and last keyframes before adding any intermediate ones. This gives you a stable range to work within and prevents unexpected value drift when you add complexity later.
After Effects vs. CSS: how do keyframes compare?
Both Adobe After Effects and CSS animations use keyframes as their core control mechanism, but their implementations differ in important ways. The table below maps the key differences.
Frames or seconds on a timeline
Percentage of the animation duration
Graph Editor with Bezier handles
animation-timing-function per keyframe
Spatial paths with editable curves
Limited to transform and translate
Set via composition settings
animation-iteration-count: infinite
Holds the last known value
Uses the element's current styles
Nearly all layer properties
Animatable CSS properties only
In After Effects, keyframes live on the timeline inside the Composition panel. You click the stopwatch icon next to any property to activate keyframe recording, then move the playhead and change the value. After Effects drops a keyframe automatically. The workflow is visual and immediate.
CSS animations work differently. You write the @keyframes rule in a stylesheet, define percentage waypoints, and attach the animation to an element using animation-name and animation-duration. The browser handles the rest. One important quirk: properties not defined in every keyframe are interpolated if possible, and dropped from the animation if not. A property that snaps instead of animating is almost always a missing keyframe definition.
The distinction between keyframes and transitions matters for web work. Transitions react to state changes like hover or focus. Keyframes run on a schedule, loop independently, and support multi-step choreography. For anything more complex than a simple hover effect, keyframes are the right tool.
For motion designers building text animations and callouts, After Effects remains the industry standard. For web UI animations, CSS keyframes offer a lightweight and browser-native solution.
What is the graph editor and why does it matter?
The Graph Editor in After Effects is where good animation becomes great animation. Graph Editors visualize property values and speed changes over time, letting you shape exactly how a property accelerates and decelerates between keyframes. Without it, you are guessing at motion feel. With it, you are sculpting it.
After Effects offers two graph views. The Value Graph shows the actual property value over time, useful for controlling position or opacity curves. The Speed Graph shows the rate of change, which is where you control acceleration and deceleration directly. Most experienced animators live in the Speed Graph because it maps directly to how motion feels.
Easing types you will use regularly:
- Linear: Constant speed. Feels mechanical. Useful for looping elements like scrolling backgrounds.
- Ease In: Slows as it arrives at the keyframe. Good for objects settling into place.
- Ease Out: Starts slow and accelerates away. Good for objects launching off screen.
- Custom Bezier: Full control via handles. The standard for professional motion work.
Keyframe easing uses incoming and outgoing interpolation controls to shape how animations approach and leave each keyframe. Drag the outgoing handle flat and the motion starts slow. Pull it steep and it launches fast. This dual control is what separates polished motion graphics from amateur work.
Two common pitfalls to avoid. First, robotic motion: applying linear interpolation to everything makes animations feel like spreadsheet charts. Add at least a gentle ease to any movement that represents a physical object. Second, overshoot: pulling Bezier handles too aggressively causes the property to go past its target value before snapping back. This can look intentional and stylish, or it can look broken. Know which one you are doing.
Pro Tip: Use the Speed Graph to shape acceleration rather than just dragging keyframes around the timeline. Shaping acceleration directly reduces guesswork and produces more natural motion with fewer keyframes.
For motion designers working on callouts that track moving objects, graph editor control is what keeps the animation locked and fluid rather than drifting and mechanical.
Best practices for working with keyframes
Good keyframe habits save hours of debugging. These practices apply whether you are working in After Effects, CSS, or any other animation tool.
-
Plan your animation sequence before placing keyframes. Sketch the start state, end state, and any critical intermediate positions. Placing keyframes without a plan leads to cluttered timelines and conflicting values.
-
Define all animated properties at every keyframe. Properties not defined across keyframes are interpolated if possible and dropped if not. A missing opacity value at 50% can cause a flash or a snap that is hard to trace.
-
Watch for duplicate percentage keyframes in CSS. Multiple keyframes at the same percentage cause all declared styles to apply simultaneously through cascading. This compositing behavior produces unexpected results in complex animations.
-
Use naming conventions in After Effects. Label your compositions, layers, and keyframe groups clearly. A timeline with 40 unlabeled keyframes across 12 layers is a debugging nightmare. Name layers by function, not by default.
-
Group related keyframes and use markers. After Effects markers let you flag important moments in the timeline. Use them to align keyframes to audio beats, scene cuts, or client-specified timing requirements.
-
Test at different playback speeds. Slow your preview to 25% speed to catch easing issues that disappear at full speed. Fast motion hides a lot of problems that become obvious when slowed down.
The importance of keyframes extends beyond the technical. Organized keyframe workflows directly affect how fast you can iterate, how clearly you can communicate with collaborators, and how confidently you can hand off a project.
Key takeaways
Keyframes are the foundational control points of all animation, and mastering their placement, interpolation, and easing is the single most direct path to professional motion quality.
At least two per property are needed to produce any visible change.
The software calculates every in-between frame — your job is the right values at the right times.
The Speed Graph controls acceleration and deceleration, turning stiff motion into natural movement.
@keyframes for multi-step and looping animation; transitions for simple two-state changes.
Undefined properties across keyframes get dropped, causing snaps that are hard to debug.
Why keyframes change how you think about motion
A lot of motion designers spend their first year treating keyframes like on/off switches: set a value here, set a value there, hit play, and hope it looks good. The results are technically correct and creatively flat — everything moves, but nothing feels right.
The shift happens when you stop thinking about keyframes as position markers and start thinking about them as moments of intention. Every keyframe is a decision: not just where something is, but how fast it got there and how it feels when it arrives. That reframe changes everything about how you approach a timeline.
The Graph Editor is intimidating at first — it looks like a financial chart, not an animation tool. But once you see the Speed Graph as the energy of the motion, it becomes the most expressive tool in the workflow. Flattening a curve at the end of a move is the difference between a ball that rolls to a stop and a ball that gets cut off mid-roll.
The honest advice: spend one full project working exclusively in the Graph Editor, even for simple animations. You'll build intuition no tutorial can give you. The motion graphics plugins available today automate a lot, but they can't replace the judgment you develop by manually shaping curves. The technical and artistic sides of keyframe animation aren't separate skills — they're the same skill viewed from different angles. The more precisely you understand interpolation, the more freely you can express motion.