
Adobe After Effects is the industry-standard tool for creating gaming intro animations, giving you frame-level control over motion, timing, and visual effects that simpler tools cannot match. A gaming intro animation is a short branded sequence, typically 5–15 seconds, that plays before your content to establish identity and energy on platforms like YouTube and Twitch. The difference between a forgettable channel and one that feels professional often comes down to that opening sequence. This guide walks you through every stage of the process: setup, animation, and export, using real techniques that hold up in 2026.
How to create gaming intro animations in After Effects
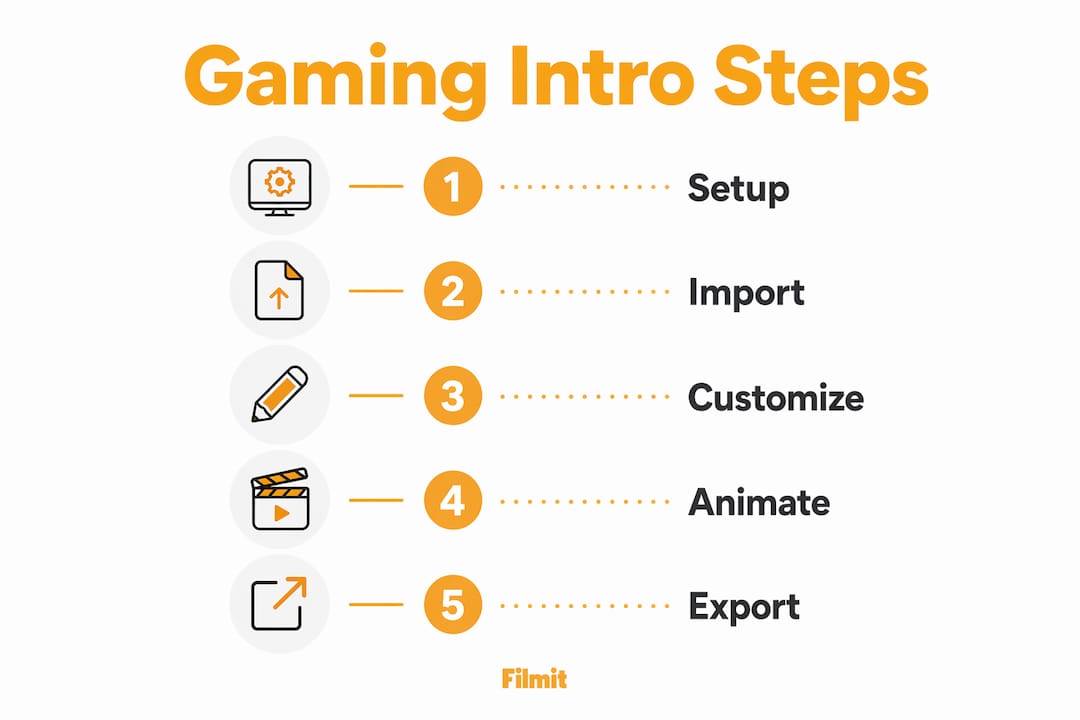
The core workflow for building a gaming intro in After Effects follows a clear sequence: set up your composition, import assets, animate with intention, then export for your platform. Skipping steps or jumping straight to polish is the fastest way to waste hours. Adobe After Effects CC22 and above is the recommended version for most gaming intro work. Several popular templates, including the “Shoot It Gaming Intro,” require no plugins and are fully compatible with CC22+, which removes a major barrier for new creators.
Working from a template does not mean settling for generic results. Templates give you a proven structure, and your customization, your logo, your color palette, your sound, is what makes the intro yours. Building from scratch is a valid path too, but it demands a solid grasp of keyframes, expressions, and layer management before you attempt anything complex.

What tools and software do you need?
Getting your setup right before you open After Effects saves significant frustration later. Here is what you need at minimum:
- Adobe After Effects CC22 or later (CC 2024 or 2025 preferred for stability)
- A GPU with at least 8GB VRAM for smooth 3D preview and render performance
- 16GB RAM minimum, 32GB recommended for complex particle or 3D layers
- Template sources like Videohive or Motionbank for ready-to-customize gaming intros
- Adobe Premiere Pro for final assembly and color finishing if your intro connects to a longer edit
- Audio assets including short sound effects and a music loop that matches your brand energy
For templates specifically, the Videohive AI-Gaming Content Intro supports vertical 9:16 format at 1080x1920 px and requires no plugins, making it a strong pick for creators targeting YouTube Shorts or TikTok alongside standard uploads.
Hardware matters more than most tutorials admit. Your GPU brand directly affects how much you gain from software upgrades. AMD and Intel GPUs show the largest performance gains in After Effects 26.2, while NVIDIA RTX cards see smaller improvements for 3D-heavy workflows. That means your upgrade path depends on what is already in your machine.
How do you set up your After Effects project for gaming intros?
Project organization is the foundation of a fast, clean workflow. A messy timeline with unlabeled layers and no precomps will slow you down the moment you need to make a change. Follow this sequence before you touch a single keyframe:
Create your main composition
For YouTube, 1920×1080 at 16:9; for Shorts or TikTok, 1080×1920 at 9:16. Match your target frame rate (usually 30 or 60fps) and set the duration to 10–15 seconds.
Import all assets upfront
Bring in your logo (vector or transparent PNG), background footage or image, music track, and sound effects, and organize everything into labeled folders in the Project panel.
Rough-place your clips
Lay your assets out in approximate order before animating anything. A structure-first pass prevents workflow paralysis and lets you see the whole shape of the intro early.
Precomp complex elements
If your logo animation spans multiple layers, nest them into a precomp. It keeps the main timeline readable and lets you adjust the logo independently.
Label and color-code layers
Use After Effects' built-in layer color labels to separate audio, text, graphics, and video. Two minutes here saves ten later.
Pro Tip: Never work directly on imported footage layers. Always duplicate and precomp before animating. If you need to swap an asset later, you replace it inside the precomp without disturbing your main timeline.
Vertical intro design requires composing specifically for the 9:16 frame from the start. Scaling a 16:9 composition down to fit a vertical frame crops your logo and crowds your HUD elements. Start vertical if you intend to publish vertical.
What are the best techniques for animating gaming intros?
Animation technique separates a gaming intro that hits hard from one that just plays. The most effective approach is audio-first timing. Drop your music or sound effect onto the timeline first, then build your visual animation around the beats and impacts.
Syncing animation to audio peaks ensures that aggressive effects like shockwaves, muzzle flashes, and particle bursts land exactly when the sound does. When the visual and audio hit together, the viewer feels it. When they are even a few frames apart, the intro feels cheap regardless of how good the graphics look.
Key techniques worth building into your workflow:
- Motion blur on fast-moving elements. Enable the motion blur switch on any fast-moving layer. It reads as speed and polish.
- Easing on keyframes. Select all keyframes and hit F9 to apply Easy Ease. Then open the Graph Editor and push the velocity curve to front-load the movement. Gaming intros feel fast because motion accelerates hard and stops sharp.
- Particle effects for FPS-style energy. After Effects’ built-in CC Particle World or third-party tools like Trapcode Particular generate sparks, smoke, and debris that sell the action-game aesthetic without requiring 3D software.
- Text animation presets. Use the built-in Animate > Text presets as a starting point, then modify timing and scale. A channel name that slams into frame and vibrates on impact reads as intentional, not accidental.
Building from a template is not a shortcut. It is a starting point. The creators whose intros feel unique are the ones who replaced every placeholder, recolored every element, and re-timed every keyframe to their own audio. The template is the skeleton. You supply the muscle.
For 3D gaming intro effects, After Effects’ Cinema 4D Lite renderer handles basic 3D text and object extrusions without leaving the app. For more complex 3D work, export from Blender or Cinema 4D and composite the rendered passes inside After Effects. This keeps your motion design flexible and your render times manageable.
What are the best export settings for YouTube and streaming?
Export settings determine whether your crisp After Effects animation arrives on YouTube looking sharp or soft and compressed. The correct format is an MP4 container with H.264 codec and AAC-LC audio. Match your original frame rate exactly. Do not guess on bitrate.
YouTube’s recommended bitrate ranges by resolution:
- 1080p at 30fps: 8 Mbps
- 1080p at 60fps: 12 Mbps
- 1440p at 60fps: 24 Mbps
- 4K at 60fps: 53 Mbps
Export using progressive scan, not interlaced. Set your audio sample rate to 48 kHz. These settings align with YouTube’s codec and container recommendations, which matter more than simply cranking bitrate to the maximum. A file exported at the correct spec will survive YouTube’s compression better than an oversized file with mismatched settings.
Use Adobe Media Encoder to export rather than rendering directly from After Effects. Media Encoder queues your render in the background, freeing After Effects for continued work. For Twitch overlays and streaming intros, export as a MOV with ProRes 4444 if you need transparency, then convert to WebM or MP4 for your streaming software.
How do you troubleshoot common After Effects gaming intro problems?
Performance problems and creative dead ends are the two most common reasons gaming intro projects stall. Both are solvable with the right approach.
On the performance side, upgrading to After Effects 26.2 delivers up to a 278% performance boost on Apple MacBook Pro M5 Max hardware for 3D-heavy workloads. That is not a minor update. Test the upgrade on a copy of your project before committing, since some expressions and third-party plugins behave differently across versions.
If previews stutter even on capable hardware, reduce your preview resolution to half or quarter in the Composition panel. Purge your disk cache regularly under Edit > Purge > All Memory and Disk Cache. For complex particle layers, pre-render them as image sequences and replace the live effect with the rendered footage. Your timeline will play back smoothly and your final render will be identical.
On the creative side, the most common mistake is chasing polish before structure is solid. Get your timing right first. Every element should hit its mark on the correct beat before you spend time on color, glow, or lens flare. Timing is the skeleton. Effects are the skin.
Pro Tip: If your intro feels busy or hard to read, mute the audio and watch it silently. If you cannot follow the visual story without sound, your composition needs simplification. Gaming intros that work silently always work with sound. The reverse is rarely true.
For vertical intro design challenges, designing for 9:16 from the start prevents the most painful layout problems. If you must adapt a horizontal template, rebuild the text and logo positions manually rather than scaling the entire composition down. Scaling compresses everything and makes your intro look like a cropped accident.
Key takeaways
The most effective gaming intro animations in After Effects combine audio-first timing, organized project structure, and platform-matched export settings to deliver professional results on YouTube and streaming platforms.
Most modern no-plugin gaming-intro templates target CC22+.
Rough-place every asset on the timeline before you animate.
Shockwaves and particle bursts land hardest when timed to the sound.
MP4 / H.264 / AAC-LC at YouTube's recommended bitrate for your resolution.
Scaling 16:9 down to 9:16 crops logos and crowds the layout.
The thing that makes a gaming intro land
The advice worth repeating: audio isn't a finishing touch, it's the blueprint. Nearly every intro that genuinely lands — the kind that makes a viewer stop scrolling — was built around a specific sound moment. The logo slam, the gunshot, the bass drop. The visual animation was designed to serve that moment, not the other way around.
The temptation when you're starting out is to build the visuals first and drop music underneath. That produces intros that look busy but feel disconnected — the energy never quite coheres. Flip the process, let the audio drive your keyframe placement, and the whole sequence starts to feel inevitable rather than assembled.
The template-versus-scratch debate is mostly a distraction. Templates aren't a crutch; they're a professional tool, and the best motion designers use them constantly — the goal is a great intro, not a demonstration of how many hours you spent. What matters is whether you pushed the template far enough that it reflects your brand. If someone can name the source template in ten seconds, you didn't push far enough.
One more thing: keeping your After Effects project lean is a creative habit, not just a performance one. Bloated projects with hundreds of unused assets and duplicate precomps slow your thinking as much as your render. Clean projects produce cleaner work.