
Designing VFX overlays in After Effects is the process of layering animated visual elements over footage to add depth, style, and motion graphics functionality to a project. The industry term for this practice is compositing, and After Effects is the standard tool for it. Whether you’re building HUD elements for a sci-fi short, stream widgets for a YouTube channel, or light leaks for a cinematic grade, the core workflow stays the same: organize your assets, use precompositions, apply blend modes, and export with alpha channel support. Get this foundation right, and every overlay you build becomes a reusable asset rather than a one-time fix.
How to design VFX overlays in After Effects: setup and tools
The four features you’ll use most in After Effects overlay design are precompositions, blend modes, track mattes, and alpha channel export. Each one handles a different part of the compositing pipeline. Precomps store animation logic. Blend modes control how a layer interacts with the footage beneath it. Track mattes define the visible shape of a layer. Alpha channel export preserves transparency when you hand off your overlay to an editor or a different project.
Before you build anything, organize your project panel into clearly labeled folders: Sources, Precomps, Renders, and Audio. This takes two minutes and saves you from hunting through 80 unnamed layers at 2 a.m. before a client deadline.

Common blend modes and their visual impact
Light leaks, glows, lens flares
Brightens; blacks become transparent
Energy effects, neon, fire
Intense brightening; saturates highlights
Film grain, textures
Increases contrast; midtones stay neutral
Shadows, dirt overlays
Darkens; whites become transparent
Subtle color washes
Gentle contrast boost; preserves detail
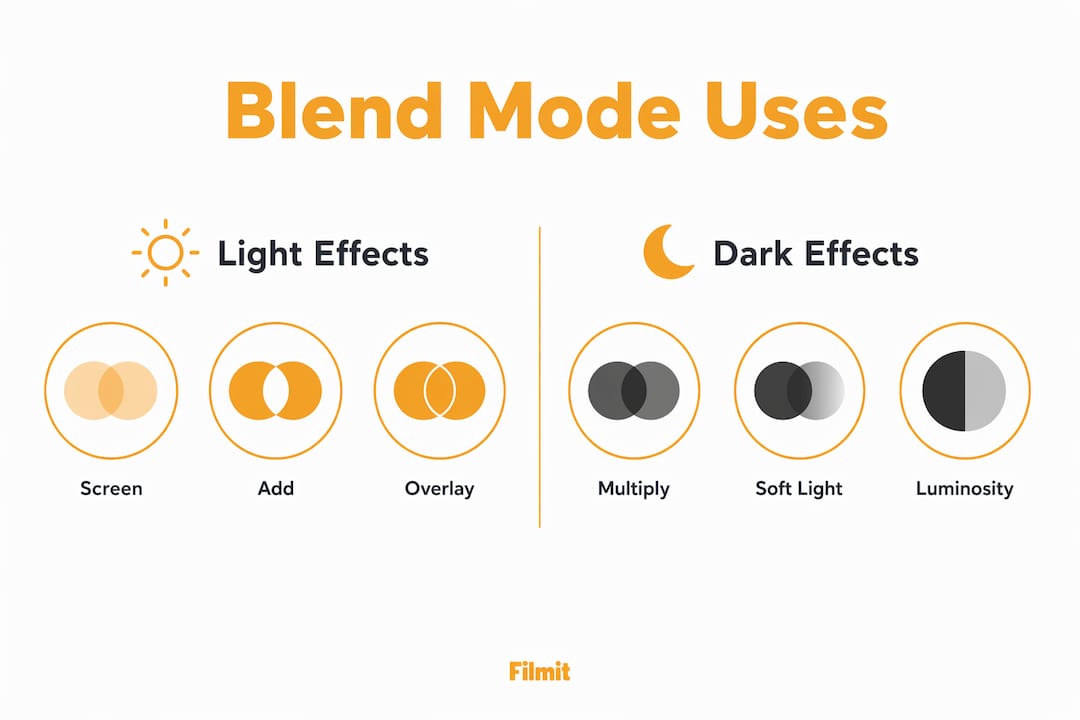
Screen, Add, and Overlay blend modes are the most common choices for light-based effects because they make black pixels invisible, letting your base footage show through naturally. Multiply does the opposite, making white pixels invisible, which is perfect for shadow overlays or grungy textures.
For export, MOV with ProRes 4444 or the Animation codec is the professional standard for preserving transparency. If your overlay is going to the web, WebM with VP9 handles alpha channels without the file size penalty of ProRes.
Pro Tip: Name every precomp with a prefix like “PC_” so it sorts separately from your footage in the project panel. You’ll thank yourself when the project grows to 40+ layers.
What is the step-by-step process to create VFX overlays?
Building a VFX overlay from scratch follows a repeatable sequence. Skipping steps early creates compounding problems later, especially when a client asks you to change the color of every element at once.
Set up your composition
Match your comp settings to your footage: frame rate, resolution, and pixel aspect ratio. Mismatched settings cause motion blur artifacts and scaling issues that are painful to fix mid-project.
Import and sort your assets
Bring in all source files, textures, and graphic elements before you start building, and drag them into your Sources folder. Importing assets mid-build breaks your organizational logic.
Build each overlay element as a precomp
Never animate directly in your master comp. Create a new precomp for each distinct element, such as a lower third, a HUD ring, or a particle burst. Precomps store animation logic, so any update inside the precomp propagates instantly across every instance.
Apply blend modes and set opacity
Drop your precomp into the master comp and assign the correct blend mode from the table above. UI elements like text or icons usually sit at 100% opacity with clean edges; light effects and textures usually land between 40% and 80%.
Animate with easing, then add secondary motion
Apply Easy Ease (F9), then go further. Duplicate your animated layer, offset it by 3 to 5 frames, scale it slightly differently, and drop its opacity. That layered variation separates real compositing from stock footage slapped on a timeline, and the movement should feel faster than your instinct tells you.
Preview and refine
RAM preview the full sequence at full resolution. Watch for edges that pop, timing that drags, or blend modes that fight the footage, and fix these before export.
Export with alpha channel
Use the Render Queue or Adobe Media Encoder. Choose MOV with ProRes 4444 for delivery to editors, or WebM with VP9 for web use.
Pro Tip: After you apply Easy Ease, open the Graph Editor and pull the velocity curves into a more aggressive arc. The default Easy Ease is a starting point, not a finished animation.
Check out Filmit’s guide on After Effects workflow best practices for a deeper look at how professional motion designers structure their projects from the first frame.
How do you troubleshoot common overlay mistakes in After Effects?
Most overlay problems in After Effects fall into three categories: track matte errors, flat animation, and project clutter. Each one has a clear fix.
Track matte errors are the most common source of confusion for editors moving into motion design. Incorrect layering of track mattes happens because the TrkMat column is hidden by default in the timeline. Press F4 to toggle it on. The matte layer must sit directly above the layer it controls. If you stack two mattes without understanding the hierarchy, you get invisible layers and no clear error message to explain why.
Luma Mattes need contrast to work. If your matte source is a gray, low-contrast image, the result looks muddy or partially transparent. Add a Levels effect to the matte layer and push the whites to pure white and the blacks to pure black before applying it.
Flat animation is the second major problem. Adding secondary motion, opacity variation, and offset timing creates organic movement. If your overlay looks like it was pasted on rather than composited in, the animation is almost certainly too slow and too uniform.
Project clutter kills revision speed. Keep these habits:
- Pre-label every layer before animating it.
- Color-code layer types: blue for precomps, red for adjustment layers, yellow for footage.
- Lock layers you’re not actively editing to prevent accidental keyframe changes.
- Use master comps to hold only instances of precomps, never raw footage or effects.
The biggest mistake is designing one-off hero shots instead of reusable systems. Professional motion design emphasizes scalable libraries with predefined hierarchy and easing.
How do you build scalable, reusable overlay systems in After Effects?
The difference between a freelancer who finishes on time and one who misses deadlines is almost always the presence or absence of a reusable overlay system. Building one takes more setup time upfront. It pays back every hour you invest within the first revision cycle.
The foundation of a scalable system is a Master Controls comp. This is a single composition that holds no visible elements. Instead, it contains sliders, color controls, and checkboxes linked via expressions to every other comp in the project. Master Controls comps with global expression controls let you change a brand color once and watch it update across 30 lower thirds simultaneously. Without this system, you’re manually opening each precomp and changing values one by one.
Structure your overlay library like this:
- Master Controls comp holds all global parameters (color, font size, animation speed).
- Element precomps hold individual animated components (icon, text box, progress bar).
- Module comps combine element precomps into complete overlays (lower third, subscribe widget, HUD panel).
- Master comp holds only module comps and the base footage.
This hierarchy mirrors the component architecture used in UI design systems like Figma’s auto-layout. The logic is the same: build small, combine upward, control globally.
For YouTube creators and streamers, this approach means a full channel rebrand takes minutes instead of days. For agency motion designers, it means client revision requests stop feeling like emergencies.
Scalable overlay system comparison
For practical examples of how animated overlays work in dynamic video contexts, Filmit’s breakdown of animated callouts for moving objects shows how the same modular logic applies to tracking-based overlays.
Key Takeaways
Designing VFX overlays in After Effects requires a precomp hierarchy, correct blend mode selection, alpha channel export, and a Master Controls system to build overlays that are fast to revise and reusable across projects.
Store animation logic in precomps so updates propagate across the entire project instantly.
Screen and Add work for light effects; Multiply works for shadows and textures.
Use MOV with ProRes 4444 for delivery or WebM with VP9 for web to preserve transparency.
Press F4 to show the TrkMat column and confirm layer order before troubleshooting anything else.
Link global parameters via expressions so brand updates take seconds, not hours.
Why overlay systems beat one-off designs every time
We have watched talented motion designers spend three days rebuilding overlays they already built six months ago. The work was good the first time. The problem was that nothing was saved as a system. Every element lived in a single project file, unnamed, un-precomped, and tied to one specific client's footage.
The shift that changes a workflow is treating every overlay project as a library build, not a deliverable. When you build a lower third, you are not building it for this video. You are building it for the next 40 videos that client will ever need. That means Master Controls, named precomps, and a folder structure another editor could open cold and understand in five minutes.
Secondary motion is the other thing most editors underestimate. Selling the illusion of an overlay living inside the footage, rather than sitting on top of it, comes down almost entirely to animation speed and variation. Your instinct says slow and graceful. The footage says faster and messier. Trust the footage: duplicate your layers, offset them, vary the opacity, and push the keyframe velocity harder than feels comfortable. The result looks real; the slow version looks like a template.
Organized overlays also make client revisions feel like a feature rather than a punishment. When a client asks to change the brand color at 5 p.m. on a Friday, a Master Controls comp means you change one slider, not open 12 precomps hoping you did not miss one. Think systemically from the first frame, and the time you spend on a proper hierarchy on day one is time you get back on every revision and every rebrand.
Build your own, or start from a library
Everything above is the skill worth having: precomp hierarchy, the right blend mode, secondary motion, and a Master Controls comp. Build overlays from scratch and you can make anything, and you understand exactly why it works.
You do not have to build every raw element by hand, though. The light leaks, film grain, bokeh, dust, and scratches that sit at the base of most overlay stacks are exactly the kind of thing worth pulling from a library rather than animating from nothing. That is what Filmit Overlays is: more than 500 premium overlays across those categories that you drag onto a clip, set to Screen or Multiply, and adjust the opacity, the same blend-mode logic from the table above. They are 4K, work in Premiere Pro and After Effects, and install through Filmit Studio.
Browse the full set on the Filmit Overlays page, then composite them into the reusable system this guide describes.


